
Setup Facebook Login for Flutter apps
Greeting from InspireUI, this is the detailed guide to clarify detail guidelines to set up the Facebook login for the Fluxstore Projects, you could use as a reference to apply for other Flutter App.
1. Video guide
This blog comes with a detailed video guideline on our Youtube Channel, you could skip the video by jumping to the next Step By Step topic 😊
2. Setup for IOS
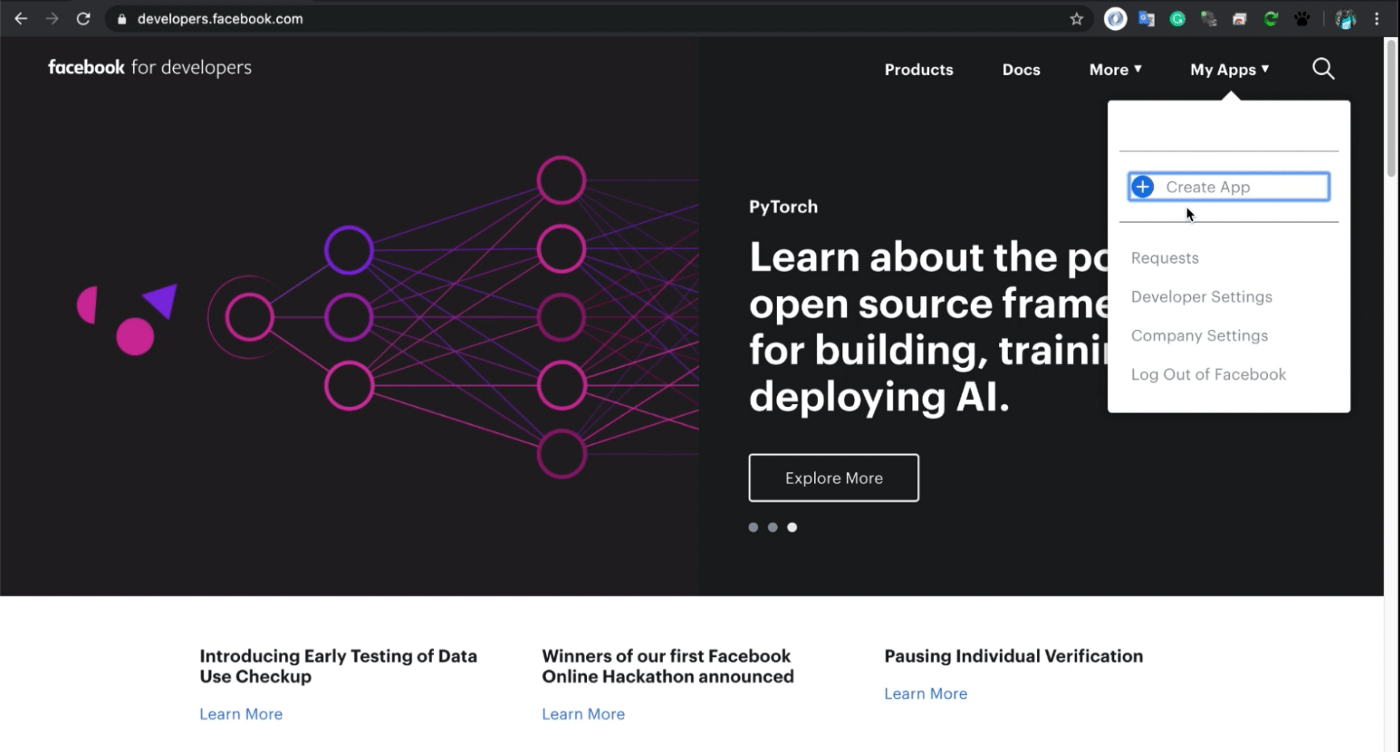
Step 1: Open https://developers.facebook.com and create your application
Step 2: Once you have created the application, start adding the Facebook Login project.
Step 3: Select the IOS platform
Step 4: Start the IOS platform setup.
- In this step, we click next to skip
- we enter the Bundle ID of the IOS project.
- Open file
project.pbxprojin your project flutter atios/Runner.xcodeproj/project.pbxproj, search with keywordPRODUCT_BUNDLE_IDENTIFIERto get Bundle ID
- Return to the developer facebook page and enter bundle ID.
- Click the save button and then
button Continueto continue
- At step 3 click next to continue
- In step 4, copy the value in the string tag (as shown below).
- Open the
info.plistfile in your project flutter and look for the keywordCFBundleURLSchemesas in the picture and paste the copied value above.
- Go back to the developer facebook, copy the code in the string tag under the key FacebookAppID
- Continue to open the info.plist file in your project flutter, find the keyword
FacebookAppIDand paste the code you just copied into the string tag as shown below.
- Okay, now the remaining steps (5, 6, 7, 8, 9) just click next to skip.
- Complete setup for the IOS platform. Now setup project login.
Step 5: On the left menu, under **Facebook Login**, select Settings. Enter your Valid Oauth Redirect URLs url.
- You can by pass this step by adding
auth / facebookto the end of your website URL (No need to have the pagehttps://<your-domain.com>/auth/facebook, but it will help by pass through this step.) - Then click Save change to save.
Step 6: Next, set up your Facebook Project, in the left menu, select Settings -> Basic.
- Enter the URL Provacy Policy URL and Terms of Service URL
- Choose the Category that suits your application.
- Click Save to save.
Step 7: Finally, activate Development mode for your project.
Step 8: Save info facebook login project
- Okay, the new Facebook login project creation has been completed.
- Save App ID and App Secret to provide for your Firebase project.
Step 9: Go back to your Firebase project page, on the left menu, select Authentication -> select Sign-in method -> Facebook
- Click Enable and enter App ID and App Secret in the previous step saved then click Save to finish.
- Oke completed the login and Facebook setup steps for IOS. Now run your app and check it out.
2. Setup for Android
Important note:
Because the project is separate between the develop and release, if you are not clear about the problem, you will be mistaken.
- When you build the debug, the application will retrieve keystore information at
**android/key-debug.properties**. You can get the SHA1 code from the keystore file in folder**android/app**. In the case of using FluxStore's default keystore, the specific keystore path is - android/app/mstore.keystore
- When you build release, the keystore information will be stored in folder
**android/key.properties**. In the case of a build release, please call the build bundle script for the application to obtain the correct keystore.
Command build release android:
sh tools / build-appbundle.shIn this case, the keystore file will be saved in folder certs/ of the project. If you build release, please get the SHA1 code of the keystore file at the path (default of FluxStore)
certs/key.jksStep 1: Open the facebook developer page in the previous Setup for IOS step. On the left menu, select Quickstart -> select Android platform
Step 2: Start the Android platform setup.
- In this step, click next to continue
- In the import the Facebook SDK step we also ignore this by clicking next
Step 3: enter the package name of the android application in the project flutter and enter the Default Activity Class Name (it is package name with the MainActivity keyword at the end)
- Find the Package name by opening your project flutter and looking for file
android/app/src/main/AndroidManifest.xml. In the second line of the file, we can easily get the package name.
- Enter the package name and Default Activity Class Name information, click Save and then Continue
- In this step, you need to add Release Key Hashes
- Copy the code
Generating a Release Key Hashand return to your project flutter
- Open the file
android/key-debug.properties(in case you are building debug) orfile android/key.properties(In case you are building release) to get information about the keystore. - Edit the code copied in the previous step
keytool -exportcert -alias <name_alias> -keystore <path_of_file_keystore> | openssl sha1 -binary | openssl base64
// Build Debug
keytool -exportcert -alias mstoreapp -keystore android/app/mstoreapp.keystore | openssl sha1 -binary | openssl base64// Build Release
keytool -exportcert -alias key -keystore certs/key.jks| openssl sha1 -binary | openssl base64
(This script is demo on MacOS, on Android please try the similar script from the Facebook Guide)
- Once completed, copy the generated code and return to the Developer Facebook page
- Enter the code, press save and then continue
- Click Next to skip this step
- In this step, you copy the following 2 codes and paste them into the file
android/app/src /main/res/values/strings.xmlinstead of the old code.
- Next steps click next to continue.
- Complete the setup process for android. Now build the app and test it.
4. Distinguish the difference between all Fluxstore apps:
- FluxStore Pro: this is a multi-purpose Flutter app compatible with all Woocommerce, Opencart 3.x, or Magento 2.x websites. If you have already released the website or setup new sites, this product is suitable for your requirements.
- FluxStore Multi Vendor: use this app to build your own marketplace like Amazon, Alibaba… This app is compatible with Woocommerce website and requires to install Dokan or WCFM plugin.
- FluxStore WooCommerce: the features are same with FluxStore Pro, but only focus compatible with any WooCommerce websites.
- FluxNews: compatible with any Wordpress templates
- FluxStore Listing: use to build innovative apps like Airbnb, TripAdvisor, Yelp or FourSquare. This app requires to install one of following WooCommerce templates: Listeo, ListingPro, or MyListing
- FluxStore Shopify: compatible with any Shopify stores
Comments